Valentine Day Card Ideas How to Draw a Rose Easy
I've been an online writer for over three years. My articles often focus on DIY projects.
Learn how to make the rose heart craft project!
Here's a Valentine's Day craft you will love making. It looks great when it's hanging up. Add a bit of class to your decor with this easy and fun to make felt craft project. Like any other craft, it might take some time to create this heart, but it's well worth the effort.
Like any other project, I suggest you gather all your supplies and read over all the directions so you know what you need. You have it right in front of you, and you know what you have to do. So, if you want to make it now, why don't you gather your supplies and start reading so you can begin!
How to Make a Valentine's Day Rose Heart
- Gather all the materials needed.
- Draw a heart shape onto your pattern paper.
- Cut out the heart shape.
- Glue your heart shape onto the cardboard/poster paper and let it dry.
- Cut several circles in different sizes from your red felt.
- Cut each felt circle in a swirling fashion.
- Make the rose.
- Cover your heart pattern with the red roses and glue them into place.
- Cut a frame out of the thin cardstock.
- Glue your frame in place around the outside of your rose filled heart.
- Cut a piece of red ribbon and make it 4 to 6 centimeters in length.
- Use the hot glue gun to glue the ribbon onto the back.
- Hang your work of art.
Step 1: Gather all the materials needed.
Step 1: Gather all your supplies and read the step by step directions
Gather your supplies and start making your rose heart.
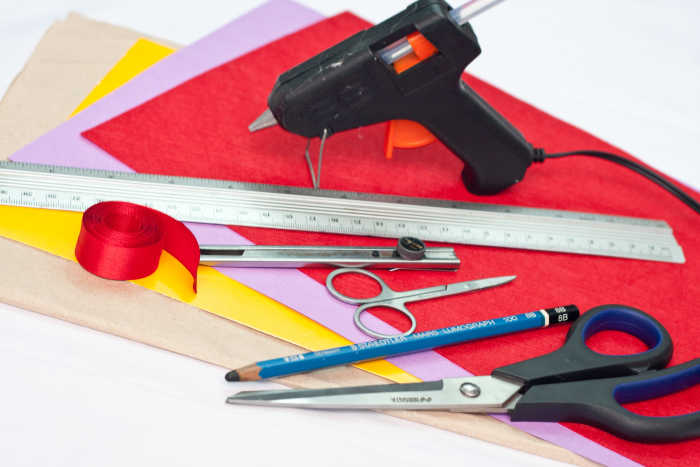
Step 1: Gather all the materials needed for this tutorial:
- A thick piece of colored cardstock, posterboard, or cardboard in the color of your choice
- A thinner sized piece of colored cardstock or cardboard in the color of your choice
- A 1.5-cm. thick red ribbon
- Red felt
- A pencil
- Short pointed craft scissors (or manicure scissors)
- Regular scissors
- Ruler
- X-Acto type cutter
- Pattern paper
- Hot glue
As with any craft project that involves scissors or a razor style cutter - watch the kids! Don't let them use anything sharp or dangerous...the same goes for the hot glue gun. Those items should be handled only by Mom!
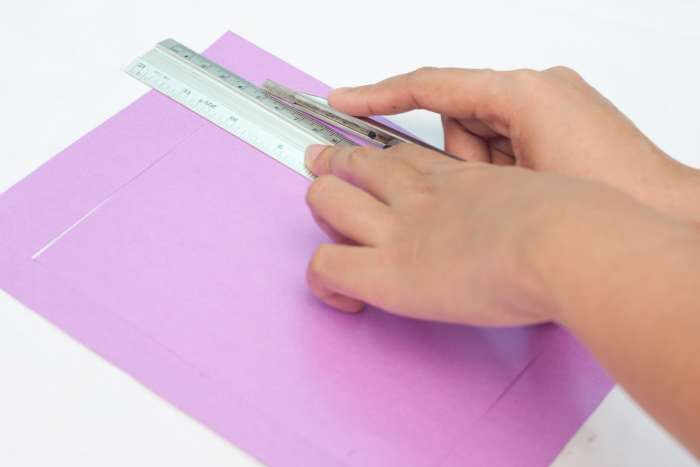
Step 2: Draw a heart shape onto your pattern paper.
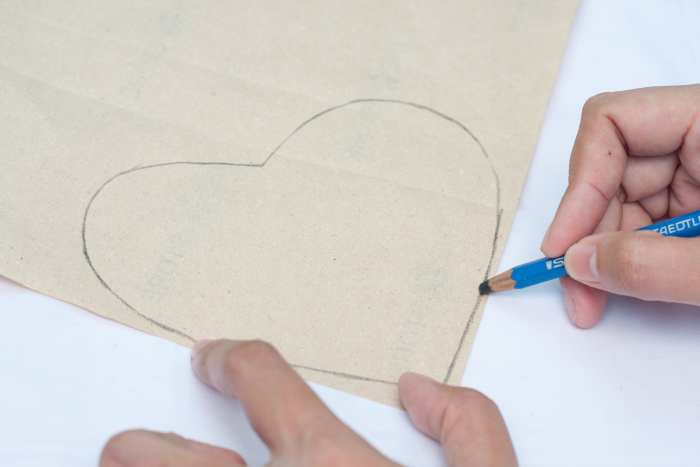
Step 2: Draw a heart shape onto your pattern paper.
Step 3: Cut out the heart shape.
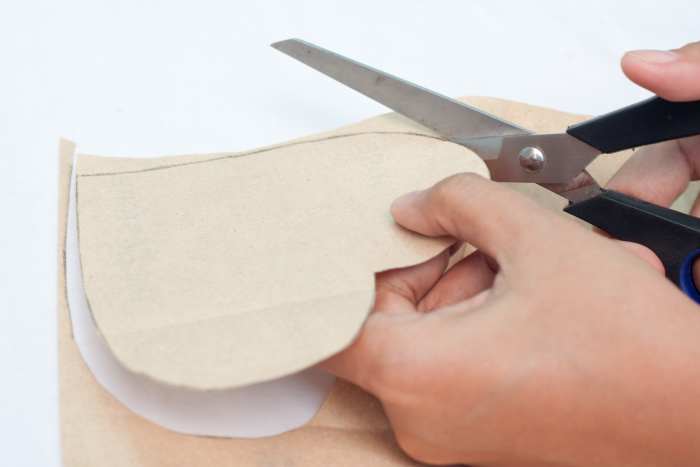
Step 3: Cut out the heart shape
Step 4: Glue your heart shape onto the cardboard/poster paper and let it dry.
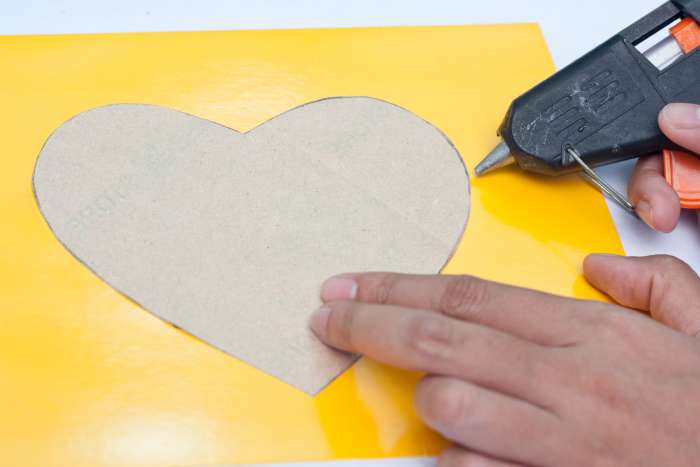
Step 4: Using hot glue, glue the heart shaped pattern onto the middle of your thick piece of cardboard. Set it aside so it can dry and continue with the next steps of your project.
Step 5: Cut several circles in different sizes from your red felt.
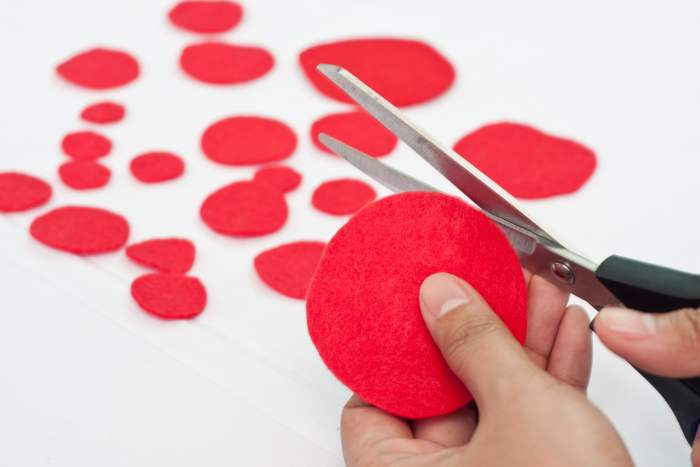
Step 5: Cut several circles in different sizes from your red felt. You are going to need a lot of these since you are going to fill up the entire heart shape with them. Of course, how many you will need exactly will depend on how big you want your ro
Scroll to Continue
Read More From Holidappy
Step 6: Cut each felt circle in a swirling fashion.
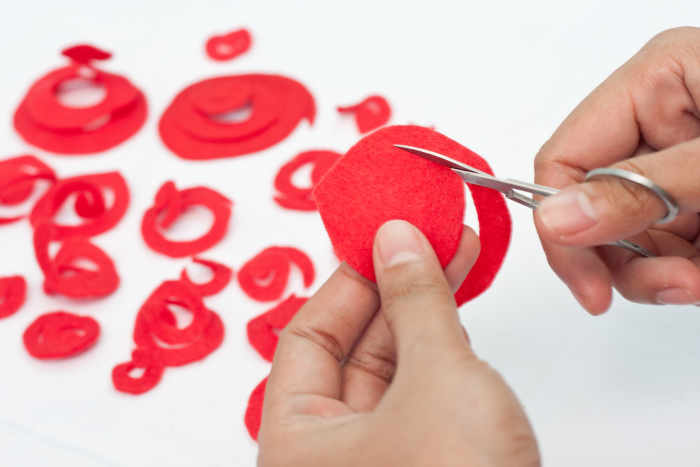
Step 6: Using the smaller scissors, cut each felt circle in a swirling fashion (take a good look at the picture above). Start from the outside and work your way to the center... but make sure not to cut the center... keep the strip intact.
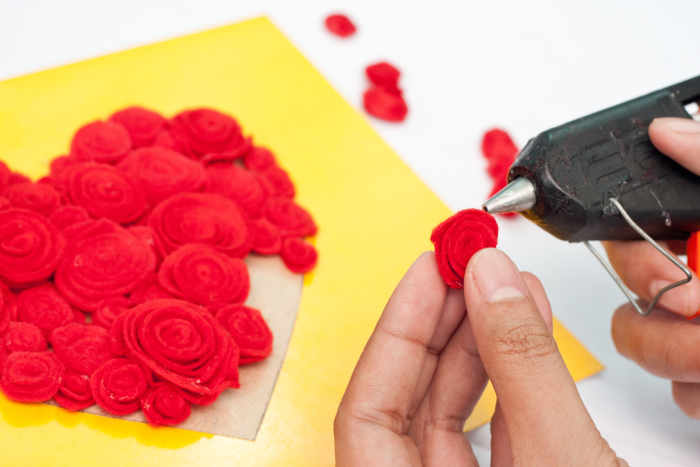
Step 7: Make the rose.
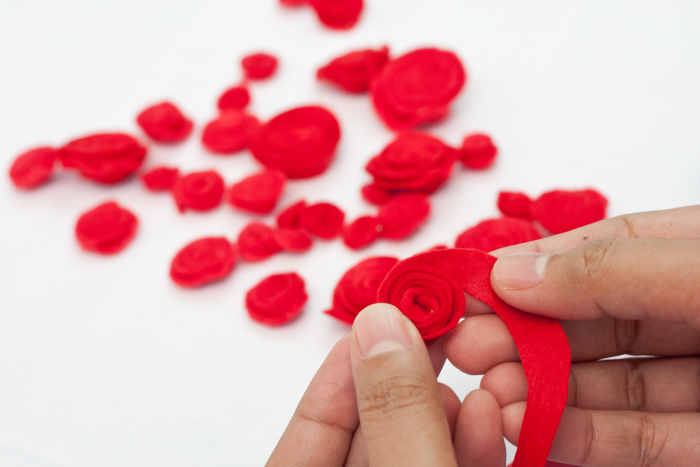
Step 7: Make the rose.
Now it's time to make the rose. You will do this by starting to roll them from the inside end of the cut red felt swirl. Roll it (not too tight, not too loose) onto itself as shown in the picture and make a bud...give it a dab of glue to hold it into place. You can also use craft glue so you don't burn yourself. When you are done, hot glue the bottom of the finished "rose". Before you glue it, check the photo to see that you have done this step correctly. The first few might be a bit difficult, but it will get easier as you make more. If you are having any problems, just study the picture. You may have to play with each rose to give it the shape you are looking for.
There's a how to video below if you feel like you need more instruction. The video shows you how to make a paper rose but the felt will work the same way.
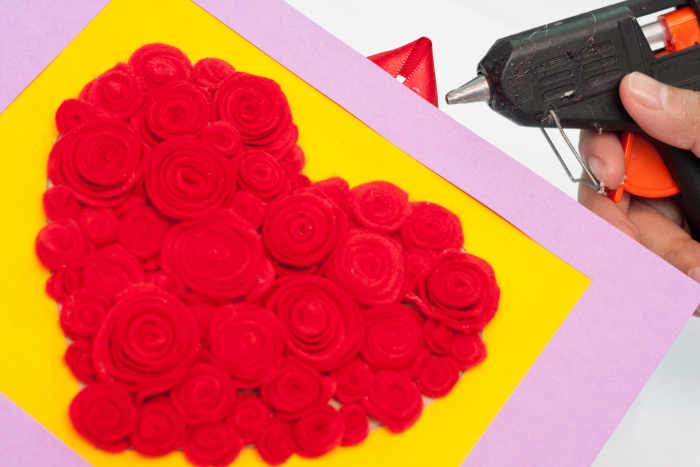
Step 8: Cover your heart pattern with the red roses and glue them into place.
Step 8: Cover your heart pattern with the red roses and glue them into place with hot glue. Shape them so they look like the roses in the picture
Fill your heart pattern with the felt roses. Spread the felt roses out and cover the pattern completely. Use smaller roses to fill in any spaces between the larger roses. Use hot glue to secure the roses in place when you have placed them where you want them.
Step 9: Cut a frame out of the thin cardstock.
Step 9: Cut a frame out of the thin cardstock/posterboard.
Use the thinner cardboard to make a "frame" for your heart shaped rose art. You can make the border as thick or thin as you like.
Step 10: Glue your frame in place around the outside of your rose filled heart.
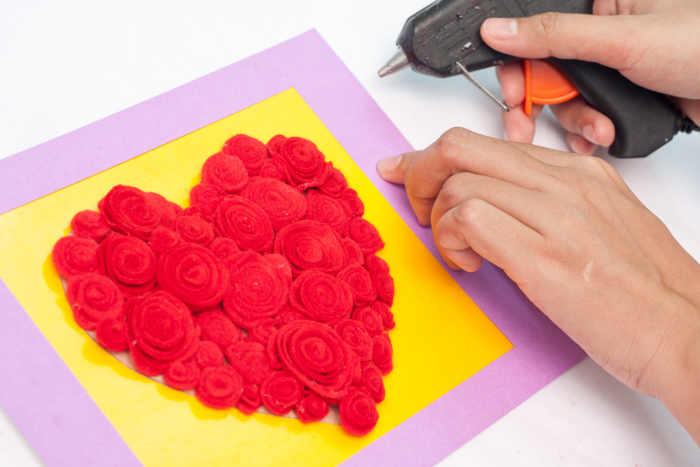
Step 10: Glue your frame in place around the outside of your rose filled heart. Using hot glue, glue the border or frame to the piece of cardboard with the roses on it.
Step 11: Cut a piece of red ribbon and make it 4 to 6 centimeters in length.
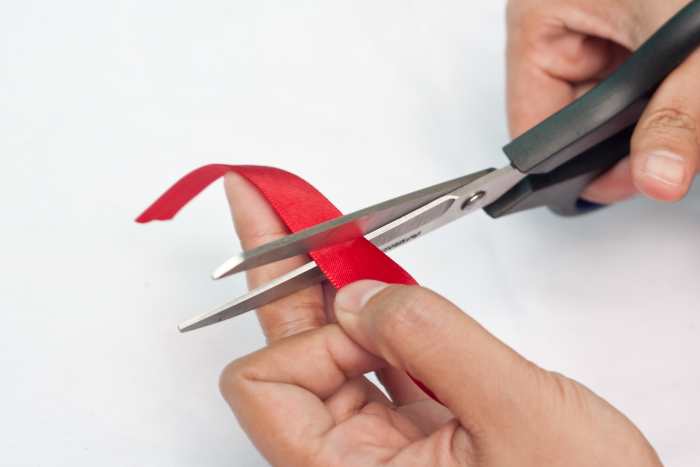
Step 11: Cut a piece of ribbon or string to use as a hanger for your art work. Cut a piece of red ribbon and make it 4 to 6 centimeters in length. You will be using this as a hanger on the back of the picture, so you can also use string.
Step 12: Use the hot glue gun to glue the ribbon onto the back.
Step 12: Glue your picture hanger onto the back of your cardstock and let it dry. Make sure it's secure.
Step 13: Hang your work of art.
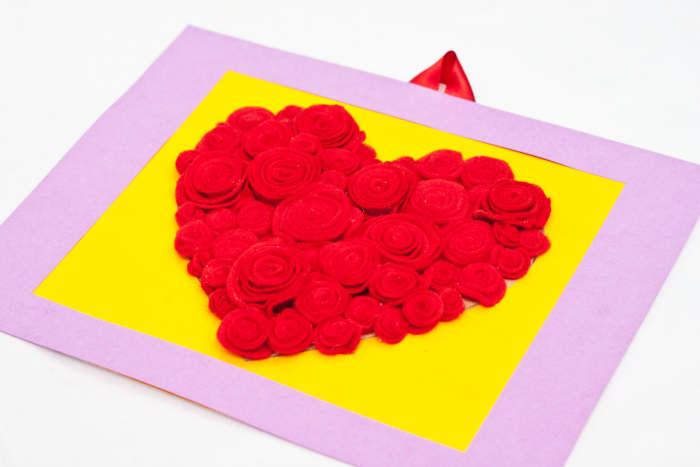
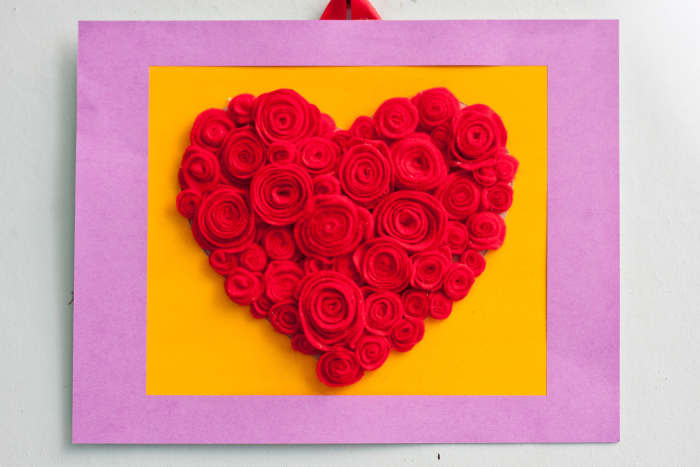
Step 13: Your heart shaped rose art is now ready to hang or be given away as a Valentine's Day gift. Now step back and take a look... your beautiful, homemade work of art is done!
Your Finished Rose Heart Craft For Kids

Okay, it's time to hang your work of art. I bet you are pretty proud of yourself, this craft looks more involved and difficult than it really is. I hope you like your picture.
Source: https://holidappy.com/holidays/How-To-Make-A-Valentines-Day-Rose-Heart-Craft-For-Kids
0 Response to "Valentine Day Card Ideas How to Draw a Rose Easy"
Post a Comment